A 4 wheeled walker helps you with walking when you can stand on both legs. If your healthcare provider has told you to be non weight bearing, partial weight bearing, or feather weight bearing, you can NOT use this walker. For these people, use what your healthcare provider has told you.
You need to be able to learn to use the hand brakes and your hands need to be strong enough to squeeze the brakes.
The 4 wheeled walker usually has a seat, pouch or basket and brakes you operate by hand (see diagram 1). They also fold down for storage or travel.
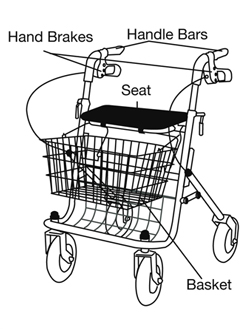
Diagram 1
Image courtesy of redcross.ca
Choosing a 4 Wheeled Walker
Speak with a healthcare provider about the type of walker that is best for you.
Look for:
- a walker frame and seat that can safely support your weight
- a way to adjust the height of the handles a seat wide enough for comfort
- the ability to sit with your feet touching the ground
- a walker that will fit through the doorways in your home
If you use a portable oxygen tank, check that:
- the tank fits in the basket on the 4 wheeled walker (wire baskets are best because they are stronger)
- you can take the oxygen tank in and out of the basket by yourself
Check whether there is an internal or external braking system. Internal brakes may add weight to the walker, but there is less chance of breaking a cable when you transport the walker. Internal brakes are recommended if you travel by plane or bus.
How to Make Your Walker the Right Height for You
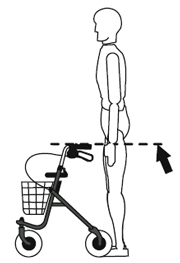
Diagram 2
Image courtesy of redcross.ca
- Put on the shoes you will be wearing when you use your walker.
- Put your walker in front of you and stand close to it.
- Stand up straight and relax your shoulders.
- Hang your arms at your sides and check that the hand grips are at your wrist (see diagram 2). Adjust the height of the walker as needed.
- You can adjust your walker height by:
- Loosening the knobs on the outside of the hand grips to raise or lower the height. Tighten the knobs once you find the correct height OR
- If your walker has bolts under the knobs, remove them and then move the hand grips to the correct height. Put the bolts back on and screw the knobs to the bolts.
- When you place both hands on the hand grips, your elbows should be slightly bent.
Walking
- Stand upright, with your feet between the back wheels of the walker and the walker a little bit around you.
- Put both hands on the handles.
- Get your balance.
- Carefully squeeze the brake handles to unlock the brakes.
- Walk close to your walker.
- To slow your walker on a slope, squeeze or pull up on the brakes (see diagram 3).
- Talk to a healthcare provider if your walker tends to speed ahead of you when the ground is level.
Walk with your back as straight as possible. Look forward and not at your feet.
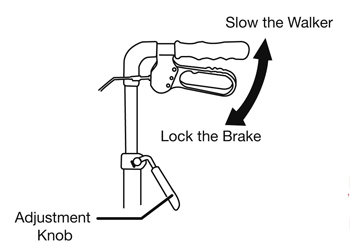
Diagram 3
Image courtesy of redcross.ca
Turning
- Hold onto the hand grips.
- Slowly move your walker as you step and turn in a large curve.
- Keep your feet between the wheels and take small steps when turning so you do not twist your leg.
Sitting on a chair or bed
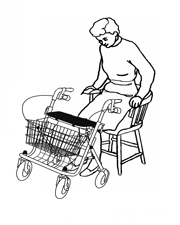
Diagram 4
Image courtesy of redcross.ca
- Get close to the chair. Walk backwards using your walker until you can feel the chair touch the back of your legs.
- Lock the brakes.
- Reach back and put both hands on the armrests or seat of the chair.
- Lower yourself gently onto the chair (see diagram 4).
- Move yourself back in the chair as needed.
Standing
- To get out of the chair, put your walker in front of you.
- Make sure the brakes are locked.
- Move yourself closer to the edge of the chair.
- Push down on the armrests or seat of the chair and lean slightly forward. Push yourself up.
- Put your hands on the handgrips.
- Get your balance before you move.
Note: Make sure the chair is stable and not too low.
Sitting on the Seat of a 4 Wheeled Walker
- If you can, put your walker against a fixed object like a wall.
- Lock the brakes.
- Turn around so your walker is behind you.
- Reach behind for the handgrips.
- Sit down slowly.
Standing Up from the Seat
- Check that the brakes are locked.
- Push down on the hand grips and lean slightly forward. Push yourself up.
- Get your balance.
- Turn around slowly so you are facing your walker. Use the handgrips for support.
Safety Tips
- Check the brakes, knobs, and screws regularly.
- Do not move your walker when you’re sitting in it.
- Do not unlock the brakes of your walker when you are sitting on it.
- Do not lean or pull on your walker when getting up or sitting down. This could make the walker tip over.
- Always wear non-skid, supportive shoes. Avoid open-heeled sandals, clogs, or slippers.
- Remove loose mats and rugs, electric cords, and cables to prevent tripping.
- Watch for wet or uneven surfaces. Take small steps if you must walk on wet, icy or uneven surfaces. Pay special attention on ramps or slopes.
- Do not use the 4 wheeled walker on stairs or escalators.
This content may be updated without notice.
For 24/7 nurse advice and general health information call Health Link at 811.