The goal is for you to get back to the activities that you were able to do before you fractured your hip. To help you reach that goal, we’ll get you moving around as soon as possible after surgery. Staff will help you, but much of the work is up to you. Keep in mind, the more active you are, the sooner you’ll be ready to go home.
Your Alberta Health Care Insurance Plan covers 1 assessment visit and 6 physiotherapy sessions after surgery. Talk to your healthcare provider to learn more.
Hip Exercises: Phase 1
Keep doing your deep breathing and coughing exercises. It’s important to exercise both legs to keep the blood flowing and help prevent blood clots. Do these until you’re getting up out of bed regularly.
It’s important to get both your strength and range of motion in your hip back after surgery. The exercises will help you do that. Do a few at a time but do them often.
To start, do the exercises at least 2 times a day, repeating each exercise 5 to 10 times. Slowly increase to 4 times a day, repeating each exercise 30 times. Do all exercises slowly and with control.
Bed Exercises
Exercise #1
- Lie on your back, bend your hip and knee by sliding your heel along the bed towards your buttocks. Putting a plastic bag on your foot may help it to slide better.
- Keep your knee facing the ceiling, hold for a count of 3 to 5.
- Lower your foot and slide it back to your start position.
- Repeat.

Exercise #2
- Place a firm roll that’s 7.5 to 12.5 cm (3 to 5 inches) around under your knee.
- Keep the back of your knee on the roll and straighten the lower leg, lifting your foot off the bed.
- Hold for a count of 3 to 5 and then slowly lower your foot.
- Repeat.

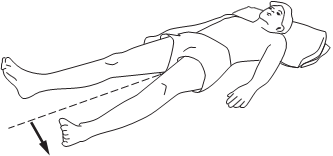
Exercise #3
- Gently move your leg out to the side and back to mid-line only.
- Keep your knee straight and toes pointing to the ceiling.
- Repeat.
A plastic bag under your leg and foot may help your leg slide more easily.
Sitting Exercises
Do these exercises with your
operated leg only.
Exercise #1
- Sit on a steady chair with your thigh supported.
- Lift your foot and straighten your knee.
- Hold for a count of 3 to 5.
- Slowly lower your foot to the floor.
- Repeat.
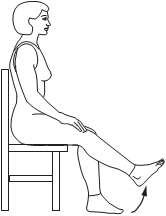
Exercise #2
- Sit on a steady chair with your feet on a smooth surface.
- Slowly slide your foot back as far as possible.
- Hold for a count of 3 to 5.
- Slowly slide your foot back to the starting position.
- Repeat.
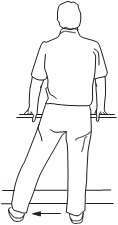
Standing Exercises
Do these once you’re able to stand safely. When doing these exercises, remember to stand straight and tuck in your pelvis and buttocks. Do these exercises with your
operated leg only.
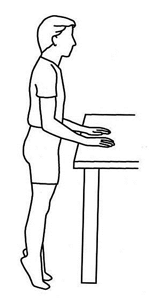
Standing against a countertop or wall with bar for support is safer than a chair. If you do use a chair, make sure it’s sturdy.
Exercise #1
- Stand with support.
- Slowly move your leg out to the side, and then back. Keep your leg straight at all times.
- Repeat.
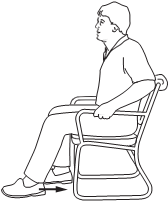
Exercise #2
- Stand with support.
- Keeping your back and legs straight, slowly move your leg behind you. Keep the leg straight. Be careful not to lean forward.
- Repeat.
Exercise #3
- Stand with support.
- Lift your knee up as if going up a stair.
- Hold for a count of 3 to 5.
- Place your foot back on the floor.
- Repeat.
Exercise #4
- Stand with support.
- Bend your knee by lifting your heel up towards your buttocks. Don’t move your thigh forward.
- Hold for a count of 3 to 5.
- Slowly lower your foot to floor.
- Repeat.
Hip Exercises: Phase 2
You can start these exercises 6 weeks after surgery
and once you’re comfortable with all the Phase 1 exercises. If they hurt too much, check with your doctor or surgeon.
Start with a few at a time and do them often. Do them at least 2 times a day, repeating each exercise 5 to 10 times. Slowly increase to 4 times a day, repeating each exercise 30 times. Do all exercises slowly and with control.
Bed Exercises
Exercise #1
- Lie on your back with knees bent and feet shoulder-width apart.
- Lift hips toward the ceiling.
- Hold for a count of 3 to 5. Remember to breathe.
- Slowly return to the starting position.
- Repeat.
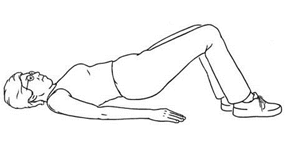
Exercise #2
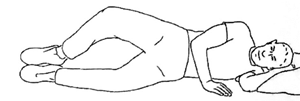
- Lie on your side with hips and knees bent. You can add a pillow between your legs for comfort or if you were told to.
- Keep your feet together. Remember not to twist or use your back muscles.
- Lift the top knee, like a clamshell opening.
- Hold for a count of 3 to 5 and slowly lower the knee.
- Repeat.
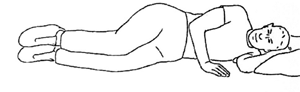
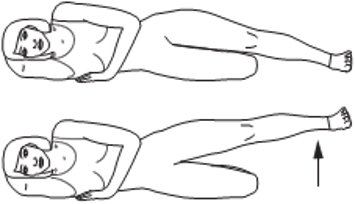
Exercise #3
- Lie on your side, with the bottom leg bent to stop you from rolling onto your back.
- Keeping the top leg straight, lift it towards the ceiling, making sure not to roll forward or backward. Keep your knee facing forward.
- Slowly lower the leg.
- Repeat.
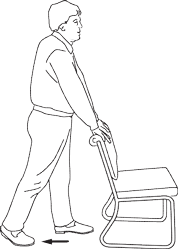
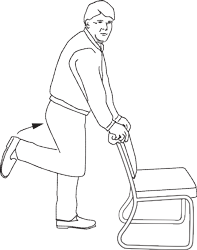
Standing Exercises
Do these exercises once you’re able to stand safely. When doing these standing exercises, remember to stand straight and tuck in your pelvis and buttocks.
Standing against a countertop or wall with bar for support is safer than using a chair. If you do use a chair, make sure it’s sturdy).
Exercise #1
- Stand with support.
- Gently rise up on your toes
- Hold for a count of 3 to 5.
- Return your feet flat on the ground.
- Repeat.
Exercise #2
- Stand with support.
- Keep your feet shoulder-width apart.
- Bend your hips and knees while keeping your back straight. Make sure your knees don’t go past your toes.
- Hold for a count of 3 to 5.
- Squeeze buttocks and thigh muscles to stand up straight.
- Repeat.
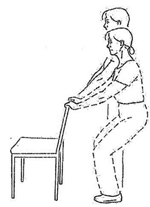
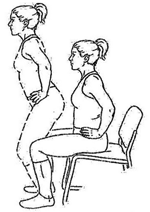
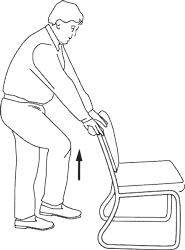
Exercise #3
- Sit on edge of chair, with your feet flat on floor.
- With your hands on your hips, stand up straight.
- Stand for a count of 3 to 5 and then sit back down.
- Repeat.